Troubleshooting
Step 1: Scanning the XR Code
Most smartphone cameras now have the ability to scan a QR Code (QRC), and a XR Code is a matrix of QR Codes invented to make t-shirt scanning easier. In some cases, this may require updating the smartphone to the most recent operating system and/or enabling such permissions. Depending on the size of the QRC, you will want to hold your phone about 6 inches up to 2+ feet away. You can also use the zoom function to bring a QRC into resolution. The better the resolution of the smartphone camera, the quicker the QRC will be recognized.


Once you scan the QRC, a popup will appear allowing you to click on the QR Code and enter the XR experience via a web browser. No app download required. Scanning may look varied depending on the device (Android or iOS) and the version of the operating system installed. For Android, follow these steps to enable QRC scanning go to Settings > Apps > Camera > Camera Settings (gear icon in the top right) > and make sure ‘Scan QR codes’ is enabled.


If your phone does not have a QR Code scanner or it does not work well, you can also download a QR Code scanning app from the app store on your device. Though we recommend using your devices QR Code scanning feature for best results.
Step 2: Accept Smartphone Permissions
Augmented reality (AR) is a new technology that utilizes features within existing smartphones such as camera, motion & acceleration, sound, and microphone to provide surprising and delightful experiences. After scanning the Z-Code and once on the landing page, tap the ‘Launch Experience’ button to start accepting the permissions required and to enter the AR experience.
Camera - XR products use augmented reality technology and require the use of a camera. Augmented reality uses a camera to overlay the physical world with digital objects. This is no different than Instagram face filters which are very popular today among all ages.
Motion & Acceleration - To provide a high-fidelity experience, motion sensors are required for the camera to map the digital objects in real space and in which direction the camera is looking. Similar permissions are required for viewing 360 images and/or 360 videos.
Microphone & Sound - Our experiences are meant to be shared with friends and family. In order to do this, you can take pictures and videos. To record video, microphone permissions are required. Similar permissions are required with FaceTime or any other video chat services.
Step 3: Enter the AR Experience!
Device & System Requirements
In general, smartphone devices produced earlier than 2017 do not support AR. More compatibility details: https://www.kisp.com/kits/knowledgecentre/is-my-phone-ar-compatible/
iOS (Apple) smartphones
Device requirements: iPhone SE (second generation), 6s and 6s Plus or more recent.
Operating System Requirements:
- iOS 11 or more recent
Android smartphones
Device requirements:
- Samsung Galaxy A5, A7, A8 and the equivalent or more recent
- Google Nexus 5X, Pixel or more recent
- LG G6, Nokia 6 or more recent
Operating System Requirements:
- Android 7.0 or more recent for most devices
Troubleshooting
Everyone’s smartphone is as unique as the person holding it and therefore may require different troubleshooting steps based on the device type, the operating system, and browser being used. The following are the most common, covering 90% of the use cases we see. If your device requires additional troubleshooting, please email info@wala.com for assistance.
Cellular Internet or WiFi Required
Unlike a downloaded application, we use your internet browser to provide access to these experiences, known as webAR. There is nothing downloaded to your device so you will need Cellular internet or direct WiFi in order to enter the experience. Here are a few basic troubleshooting steps:
- Make sure you have good cellular connectivity.
- If you are trying to use WiFi, make sure you are logged into the WiFi correctly.
- Public WiFi working is dependent on the service provider.
- Too many people in one area can slow down loading time.
- Click ‘Refresh’ if the splash page does not load after successfully scanning the Z-Code.
iOS (Apple) Settings
In general, you want to make sure your iOS is updated to the most recent version. In addition, here are a few settings to check:
- Popup Blocker - currently, iOS reads some AR features as popups, so you will need to disable your popup blocker for best results. To do this go to Settings > Safari > PopUp Blocker and toggle off.
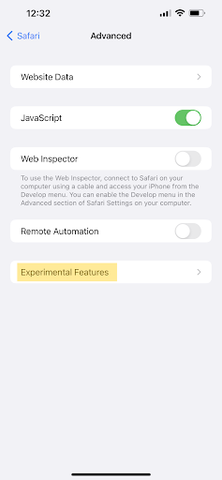
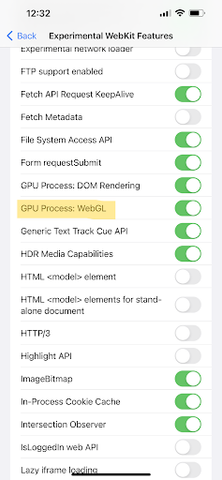
- GPU Process: WebGL enabled - if when trying to enter the experience, your browser constantly crashes, you will enable this setting. With recent iOS updates, this setting is generally enabled automatically. To do this go to Settings > Safari > Advanced > Experimental Features > scroll down to ‘GPU Process: WebGL and make sure it is enabled


Safari (recommended)
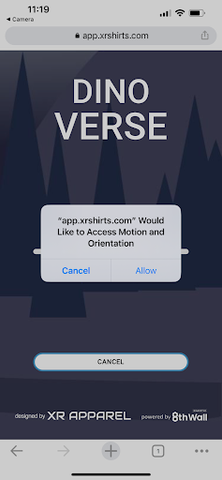
When entering the experience on the Safari browser, you will be asked to allow Motion & Acceleration as well as Camera & Microphone. If you ‘Don’t Allow’ then you will not be able to enter the AR experience because augmented reality technology cannot work without these features.
If you accidentally tap ‘Don’t Allow’ and are stuck on the loading page, you will need to go through these troubleshooting steps or ‘Clear Cookies’ step below.
Here is what those popups will look like:


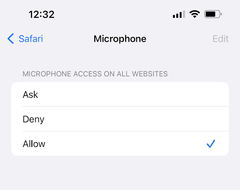
If you are using Safari as your main browser, you can also enable permissions by following these steps: go to Settings > Safari > scroll down to Camera and/or Microphone and set it to either ‘Ask’ or ‘Allow’. If you set it as ‘Ask’ then it will ask you to enable your Camera and/or Microphone every time you go to enter the experience. Make sure to ‘Clear Cookies’ step below to reset the browser and enable these settings.


Clear Cookies - In general, if you are having permission issues, you can always clear your history and website data as a catch all. Just rescan the shirt afterwards. To do this go to Settings > Safari > and scroll down to Clear History and Website Data. Rescan the QRC or refresh the page to continue.

Chrome
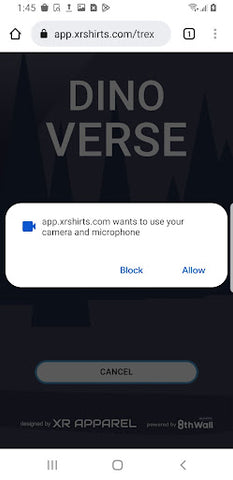
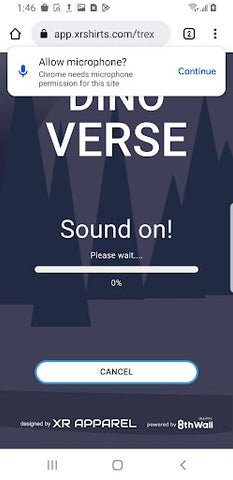
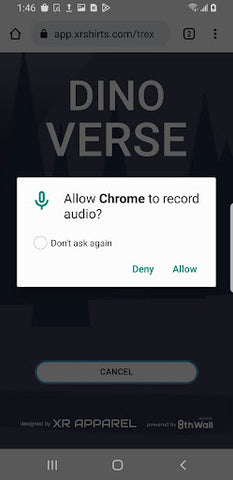
When entering the experience on the Chrome browser, you will be asked to allow Motion & Acceleration as well as Camera & Microphone. If you ‘Don’t Allow’ then you will not be able to enter the AR experience because augmented reality technology cannot work without these features.
Here is what those popups will look like:


If you are using Chrome as your main browser, you can also enable permissions by following these steps: go to Settings > Chrome > and make sure that Camera and/or Microphone are enabled’.

If you accidentally tap ‘Don’t Allow’ and are stuck on the loading page, you will need to go through these troubleshooting steps and clear cookies.
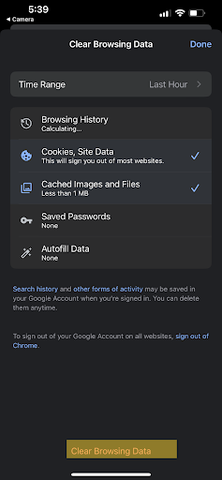
- In the Chrome browser, tap on the ellipsis (...) in the bottom right hand corner of the screen.
- Scroll down to ‘Clear Browsing Data’ and tap.
- Make sure that ‘Cookies, Site Data’ and Cached Images & Files are selected.
- Tap ‘Clear Browsing Data’ at the bottom of the screen.
- Refresh the page and you are all set!


Android
In general, you want to make sure your device is updated to the most recent version. If you want to preset permissions and/or check that permissions are set correctly follow these steps. Go to Settings > scroll down to ‘App’s > select your default browser app (ie. Internet or Chrome) > scroll down to ‘Permissions’ > and make sure that Camera and Microphone are enabled.


Default Browser (recommended)
When entering the experience for the first time, you will need to Allow camera and microphone permissions. Below is what these pop ups will look like.


If you are using the Android default browser and you are not able to enter the experience, or accidentally ‘Deny’ a permission, use these troubleshooting steps:
- On the splash page, select the three lines (𝄘) at the bottom right hand corner.
- Select ‘Settings’
- Select ‘Sites and downloads’
- Select ‘Site permissions’
- Make sure that Camera and Microphone are enabled.
- Go back to ‘Sites and downloads’
- Select ‘Manage website data’
- Select ‘Delete’ and delete ‘All’ data.
- Go back all the way to the browser splash page and refresh. You should be good to go and will have to again ‘Allow’ required permissions.


Chrome
When entering the experience for the first time, you will need to Allow camera and microphone permissions. Below is what these pop ups will look like.


If you are using Chrome as your default browser and you are not able to enter the experience, or accidentally ‘Deny’ a permission, use these troubleshooting steps:
- On the splash page, select the ellipsis (⠇) at the top right hand corner.
- Scroll down to select ‘Settings’
- Scroll down to select ‘Site settings’
- Select ‘Camera’
- Make sure that camera is enabled.
- Check for any ‘Blocked’ websites that have ‘https://app.xrshirts.com’ and select it if found.
- Change to ‘Allow’ or select ‘Remove’.
- Repeat the steps of #4 for both ‘Microphone’ and ‘Motion sensors’
- Go back all the way to the browser splash page.
- Refresh the page by selecting the ellipsis (⠇) in the top right hand corner.
- Select the refresh icon (⭮) in the top right hand corner. You should be good to go and may have to again ‘Allow’ the required permissions.


Privacy Policy
We do not sell your data. All user data is encrypted and stored securely according to CCPA and GDPR requirements. Data is used for product enhancements, troubleshooting, company specific advertising, and to connect with customers only. Customers can request that their data be deleted at any time by emailing info@wala.com.